How to Deploy a Kubernetes Cluster with Ubuntu Server 20.04
In This tutorial, we will discuss How to Deploy a Kubernetes Cluster with Ubuntu Server 20.04. Kubernetes is an open-source container orchestration tool. Kubernetes was developed by google in 2014. Kubernetes main use manages containerized applications in different deployment environments. Like: physical, virtual, cloud, etc.
Install Docker
The first thing to be done is the installation of Docker. using the below command:
sudo apt-get install docker.ioOnce Docker is installed, please check the below command.
sudo docker --version
Output: Docker version 19.03.8, build afacb8b7f0
We need to add your user to the docker group.
sudo usermod -aG docker $USERNow the docker start and enable daemon with the commands:
sudo systemctl start dockersudo systemctl enable docker Output: Created symlink /etc/systemd/system/multi-user.target.wants/docker.service → /lib/systemd/system/docker.service.
systemctl status docker
Install Kubernetes
We need to install Kubernetes. first add the Kubernetes GPG key with the below command:
curl -s https://packages.cloud.google.com/apt/doc/apt-key.gpg | sudo apt-key add

Output: OK
Next, add the necessary repository with the below command:
sudo apt-add-repository "deb http://apt.kubernetes.io/ kubernetes-xenial main"Install the necessary software with the below command:
sudo apt-get install kubeadm kubelet kubectl -yThe above command get all the necessary dependencies and completes them without fail.
Hostnames
You will assign specific hostnames to each server. you can change the hostname, the below command:
sudo hostnamectl set-hostname HOSTNAMECheck hostname changed using the below command:
hostname

Output: Kubemaster
You might opt to use hostnames like:
kubemaster
kubenode1
kubenode2
Etc.
Now logout and log in. Finally, check hostnames to IP addresses. Open the host’s file with the command:
vi /etc/hosts# /etc/hosts
192.168.1.195 kubemaster
192.168.1.196 kubenode1
192.168.1.197 kubenode2Save and close the file.
Disable Swap
First, you must first disable the swap. To do this command:
sudo swapoff -aAnd make that permanent swap (otherwise, the swap will re-enable at reboot).
sudo vi /etc/fstab
Initializing the Master
The next step is to initialize your master.
sudo kubeadm init --pod-network-cidr=10.244.0.0/16When the initialization completes, join the nodes to the master.
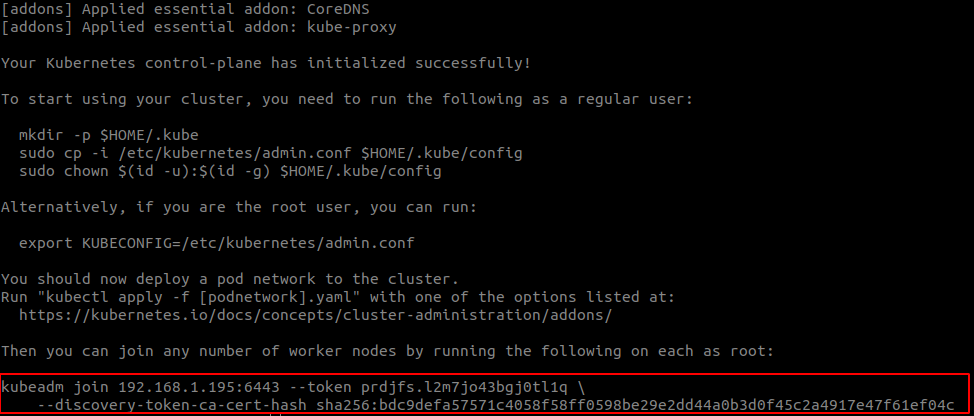
Create a directory for the cluster.
mkdir -p $HOME/.kubeNow copy the config file into this directory:
sudo cp -i /etc/kubernetes/admin.conf $HOME/.kube/configGive The config file the proper permissions using the below command:
sudo chown $(id -u):$(id -g) $HOME/.kube/configDeploy a Pod Network
Before you join the nodes to the master, you must first deploy a pod network. Your pod network is Flannel (run only on the MASTER).
kubectl apply -f https://raw.githubusercontent.com/coreos/flannel/master/Documentation/kube-flannel.yml

Output: podsecuritypolicy.policy/psp.flannel.unprivileged created
clusterrole.rbac.authorization.k8s.io/flannel created
clusterrolebinding.rbac.authorization.k8s.io/flannel created
serviceaccount/flannel created
configmap/kube-flannel-cfg created
daemonset.apps/kube-flannel-ds created
Join a node to the master
Now ready to join your nodes to the master.
sudo kubeadm join 192.168.1.195:6443 --token prdjfs.l2m7jo43bgj0tl1q --discovery-token-ca-cert-hash sha256:bdc9defa57571c4058f58ff0598be29e2dd44a0b3d0f45c2a4917e47f61ef04cNow the join has succeeded, Go back to your master and run the command:
kubectl get nodes
Finally, your Kubernetes cluster is ready for the deployment of your first containerized application. And don’t forget, if you want to join new nodes to the master, you’ll run the join command.
kubeadm token create --print-join-command

