How to Use Yajra Datatables in Laravel?
This tutorial is for How to Use Yajra Datatables in Laravel? The complete step by step guide of How to Use Yajra Datatables in Laravel?. First We need to Download fresh latest Laravel setup. Yajra package is created to handle server-side works of Data Tables jQuery Plugin via AJAX by using Eloquent ORM etc.
Step 1 : Install Laravel 6
composer create-project --prefer-dist laravel/laravel blogStep 2 : Install Yajra Datatable
composer require yajra/laravel-datatables-oracleAfter that you need to set providers and alias.
#config/app.php

<?php

.....
'providers' => [
    ....
    Yajra\DataTables\DataTablesServiceProvider::class,
]
'aliases' => [
    ....
    'DataTables' => Yajra\DataTables\Facades\DataTables::class,
]
.....

?>
Step 3 : Create Controller
#app/Http/Controllers/SurnameController.php

<?php

namespace App\Http\Controllers;

use App\Surname;
use Illuminate\Http\Request;
use DataTables;

class SurnameController extends Controller
{
    public function index() {
        return view('surname.index');
    }
    public function getdataTableResponse(Request $request) {
        if($request->ajax()) {
            $data = Surname::latest()->get();
            return DataTables::of($data)
                ->addIndexColumn()
                ->addColumn('actions', function($row) {
                    $btn = '<button type="button" data-id="'.$row->id.'" data-toggle="modal" data-target="#AddEditModal" class="btn-edit btn btn-success btn-sm">Edit</button>
                        <button type="button" data-id="'.$row->id.'"   class="btn-delete btn btn-danger btn-sm">Delete</button>';
                    return $btn;
                })
                ->editColumn('updated_at',function($object){
                   return  $object->updated_at->diffForHumans();
                })
                ->editColumn('created_at',function($object){
                    return  $object->created_at->diffForHumans();
                })
                ->rawColumns(['actions'])
                ->make(true);
        }
    }
}
?>
Step 4 : Create View
#resources/views/surname/index.blade.php

<!doctype html>
<html lang="en">
<head>
    <meta charset="utf-8">
    <meta name="viewport" content="width=device-width, initial-scale=1">

    <title>How to use Yajra Datatables in Laravel?</title>

    <!-- Bootstrap -->
 <link href="bootstrap.min.css" rel="stylesheet">
  <!-- Datatables -->
  <link href="dataTables.bootstrap.min.css" rel="stylesheet">
  <link href="buttons.bootstrap.min.css" rel="stylesheet">
  <link href="responsive.bootstrap.min.css" rel="stylesheet">
  <link href="scroller.bootstrap.min.css" rel="stylesheet">
</head>
                       <table id="surname_table" class="table table-striped table-bordered">
                          <thead>
                              <tr>
                                <th>Sr No.</th>
                                <th>name</th>
                                <th>Created At</th>
                                <th>Action</th>
                              </tr>
                          </thead>
                          <tbody>
                          </tbody>
                        </table>

   <!-- jQuery -->
    <script src="jquery.min.js"></script>
    <!-- Bootstrap -->
    <script src="bootstrap.min.js"></script>
     <!-- Datatables -->
    <script src="jquery.dataTables.min.js"></script>
    <script src="dataTables.bootstrap.min.js"></script>
    <script src="dataTables.buttons.min.js"></script>
    <script src="dataTables.responsive.min.js"></script>
    <script src="responsive.bootstrap.js"></script>
    <script src="dataTables.scroller.min.js"></script>
<script>
$(document).ready(function(){

  $('#surname_table').DataTable({
      processing: true,
      serverSide: true,
      ajax: "{{ url('/surname-get-datatable-response') }}",
      columns: [
              {data: 'DT_RowIndex', orderable: false, searchable: false},
              { data: 'name' },
              { data: 'created_at'},
              { data: 'actions' },
            ],
            "columnDefs": [ {
              "targets": [0,2],
              "orderable": false
            }]
      });

});
</script>
Step 6 : Add Route
#routes/web.php
Route::resource('surname','SurnameController');
Route::get('surname-get-datatable-response','SurnameController@getdataTableResponse');
Step 7 : Now we are ready to run our example:
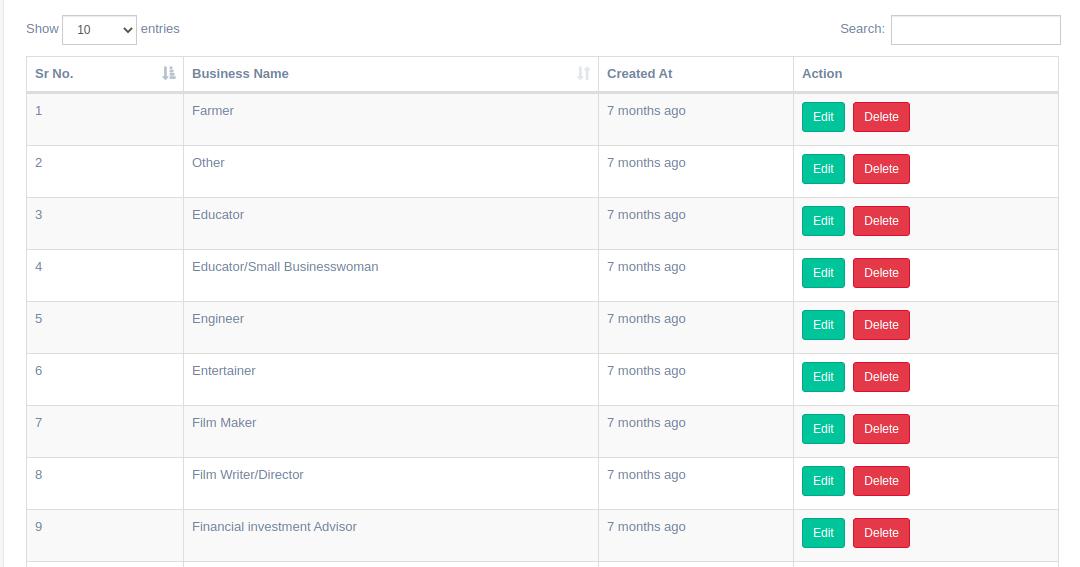
php artisan serveNow open your project url on your browser:
http://localhost:8000/surname

